Tuesday, October 22, 2013

Beef Stew

Beef Stew 


3 lbs boneless chuck roast cut into 2-inch pieces 
3 tbsp vegetable oil 
2 tsp salt 
1 tbsp freshly ground pepper 
2 yellow onions, cut into 1-inch chunks 
1/4 cup flour 
3 cloves garlic, minced 
1 cup red wine 
3 cups beef broth 
1/2 tsp dried rosemary 
1 bay leaf 
1/2 tsp dried thyme 
4 carrots, peeled, cut into 1-inch slices 
2 stalks celery, cut into 1-inch slices 
3 large russet potatoes, peeled and cut in eighths 

Directions: 

On medium-high heat, add the vegetable oil to a large heavy pot (one that has a tight fitting lid). When it begins to smoke slightly, add the beef and brown very well. Do in batches if necessary. 

Add the salt and pepper as the beef browns. Once
browned, remove the beef with a slotted spoon set aside. Add the onions and sauté for about 5 minutes, until softened. Reduce heat to medium-low, and add the flour and cook for 2 minutes stirring often. Add the garlic and cook for 1 minute. 

Add wine and deglaze the pan, scraping any brown bits stuck to the bottom of the pan. The flour will start to thicken the wine as it comes to a simmer. Simmer wine for 5 minutes, and then add the broth, bay leaves, thyme, rosemary, and the beef. Bring back to a gentle simmer, cover and cook on very low for about 1 hour. 

Add potatoes, carrots, and celery, and simmer covered for another 30 minutes or until the meat and vegetables are tender. Taste and adjust seasoning. Turn off heat and let sit for 15 minutes before serving. 


This tastes best if it's made the day before and all the flavors have a chance to really meld together.

Sunday, October 20, 2013

Malibu Chicken Nuggets

It's football Sunday and my six month  anniversary with my love!  In honor of our 49ers kicking ass and his favorite, Malibu Chicken, I made the favorite food snack size...perfect for football Sunday!

Malibu Chicken Nuggets


1 chicken breast - cut into nugget size 
5 slices of ham - sliced into squares size of nuggets
4 slices of Swiss cheese - sliced into squares size of nuggets 
1/2 cup bread crumbs seasoned with salt, pepper, garlic powder, chili powder
1 egg
Olive oil

Preheat oven to 350 and oil bottom of baking dish.

Dip chicken nugget into egg and cover with bread crumbs and put onto piled baking dish. Repeat until all nuggets are done. Bake for about 10-15 minutes. 

Remove from oven and turn over. Cover each with a square or two of ham and top with Swiss cheese. Return to the oven until cheese is melted.

Mustard Sauce

2 tablespoons Grey Poupon
1 teaspoon yellow mustard 
3 tablespoons mayo

Mix together and serve with chicken.


Thursday, October 17, 2013

Sausage & Spinach Stuffed Shells

I love to cook and I was looking for something to make for my boyfriend for our regular Thursday night dinner dates! I came across a recipe for stuffed shells and I was instantly inspired, but, as usual, I had to revise to my taste...so here is my version.


Sausage & Spinach Stuffed Shells


Ingredients:

1 box of jumbo shells
2 lbs Italian sausage (out of casing)
1 package baby bellas
12 oz spinach
20 oz ricotta cheese
10 oz fresh grated Parmesan
2 eggs
1/2 cup bread crumbs
1 can diced tomatoes
2 jar marinara sauce
Onion
Garlic
Olive oil
Red pepper flakes
Salt & pepper
Pastry filling bag


Directions:


Cook jumbo shells as directed, drain in cold water and set aside.


Heat up some olive oil and soften as much onion and garlic. Brown your sausage with salt, pepper and red pepper flakes.


Add sliced mushrooms - break up a bit as you mix and soften.


Add spinach and cook together.


Drain sausage mixture and set aside to cool down a bit.


Pour half of your jar of pasta sauce in your baking dish - enough to cover the bottom.


In a large mixing bowl, lightly whip up the eggs add the ricotta cheese,most of the parmesan (same some for topping), and the bread crumbs.  Mix in the sausage, mushroom & spinach mixture - thoroughly mix together.  Put the filling in the pastry bag, fill the shells and place filled shells in the baking dish.


Top your tray full of shells with the diced tomatoes and the rest of the pasta sauce and bake at 375 degrees for about 30 minutes.  


Remove and sprinkle remaining parmesan cheese and return to oven until cheese is melted.


Sunday, September 29, 2013

Turducken - of sorts...Introducing, the Cornturduck!!!


My boyfriend requested I make a Turducken for Thanksgiving.  Having never made a Turducken before, I told him I had to practice.  And as crazy as I am about cooking and making way too much food, I actually recognized that I shouldn’t make a WHOLE turkey wrapped around a whole duck wrapped around a chicken!  I thought of other options of how I could accomplish such a feat…after all, I had to learn how to debone a whole bird – 3 of them, to be exact.


Well, when I finally decided I was going to just wrap a turkey breast around a duck breast around a chicken breast, it dawned on me…CORNISH GAME HEN!!!  So, I bought two Cornish game hens, a turkey breast and a duck leg/drumstick, and my project began. 


The turkey breast was boneless, so that was easy.  The duck was just the leg and thigh, and going to be buried deep in this clusterfowl, so I wasn’t worried about how that looked getting deboned.  The Cornish game hen was another story.  This was going to the outside, the presentation and it needed to be perfect.  I googled “how to debone poultry” and clicked on a few links, but my favorite was from The Artisan Table.  Here is the link.


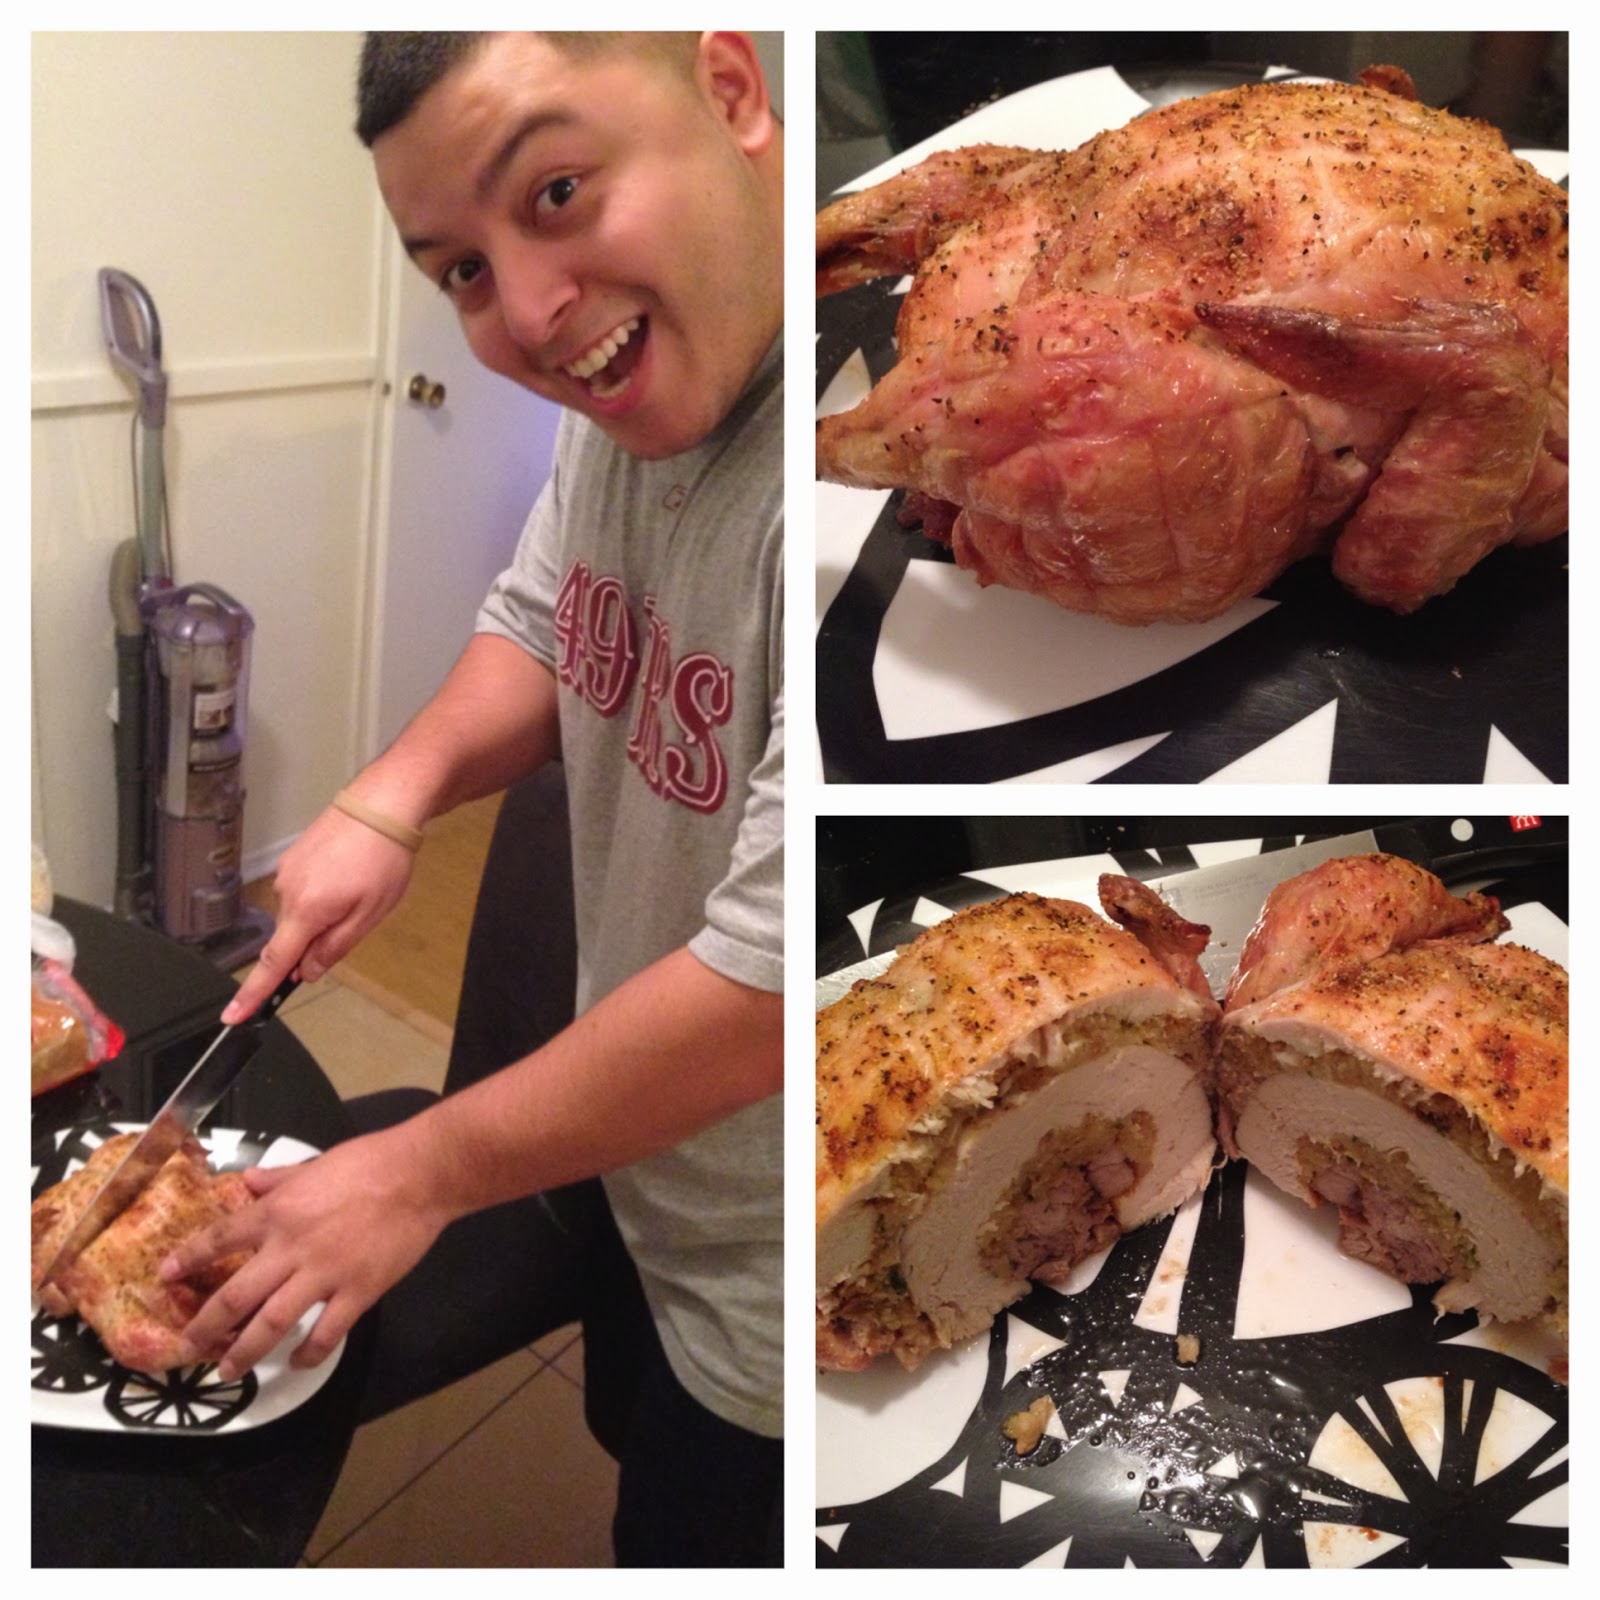
My boyfriend was in charge of the iPad with instructions and reading them to me and I got my hands dirty.  We had two birds to practice on and I’m very proud to say that I was happy with the final product.


So, here’s what you need to put together a Turducken, or in my case, a Cornturduck:


Typical Turducken will require about a 16 lb turkey, 4 lb duck and 3 lb chicken with the duck and chicken completely deboned and the turkey mostly deboned, except for the wings and legs – need those to make sure it still looks like a turkey!

My Cornturduck, I used 2 cornish game hens (deboned except for wings and legs), boneless turkey breast and boneless duck thighs.

Stuffing – you can use stove top or make however you usually do. 


Toothpicks and Kitchen twine (I was lucky enough to have this perfectly sized cooking net wrap from my turkey breast that I used to hold my birdies together)


Directions for Assembly:


Preheat your oven to 375 degrees.  It does take some time to put this bird together, so you may want to do it at the start or ask a helper to do so midway through your birdie assembly.


Take your outside bird (turkey or Cornish game hen) and lay it skin side down on a clean surface – like a large cutting board.  Season as you would like – salt, pepper, I add butter to make it juicy.  Cover with a layer of stuffing and put in extra in the leg and wing cavities to help keep them up once it’s all put together.


Grab your next birdie and season both sides, then lay it skin side (or what would be skin side, if it’s not skinless too) on top of the stuffing and I added some more butter to make it juicy.  This would be the duck for traditional Turducken or turkey breast for my Cornturduck.  Before I did this, I did flatten and even out my turkey breast with a mallet first and I did have to cut to fit in the area.  My dog LOVED the turkey I cooked up for her as a result of the extra meat!  Anyway, back to the directions, cover with a layer of stuffing.


Repeat the previous step with your last birdie – chicken for a Turducken or duck thigh for my Cornturduck.  I also made sure this fit in the area, seasoned both sided and added butter and a layer of stuffing.  Now it’s ready for assembly!


As I mentioned, I got lucky with a wraparound net I had on hand, but I would have used toothpicks and twine to close this hybrid birdie shut.  You would need an extra set of hands for this I either way.  To close with toothpicks and twine, gently bring the outside bird’s outside edges together to close up and look like a whole bird.  Push toothpicks through both sides going down and then lace the kitchen twine around the toothpicks to hold it all together.


Carefully turn your Frankenbirdie over and place in your roasting pan breast side up.  Gently rub seasoning on the outside.  I am notorious for putting pads of butter between the skin and breast meat, and I think you know why by now.  Funny side note about me, I was never really a fan of butter – didn’t really butter my bread, I just plain avoided it, but it sure does make for delicious food when cooking!


Now you’re ready to cook this baby!  I would treat it like you would roasting any bird and if you need pointers, check out my Thanksgiving post and there are directions for making a Turkey.  Put in your preheated oven and baste every 30 minutes or so to prevent from drying out.  Cook until the thighs are 180 degrees and stuffed area is 165 degrees – check 2-3 different places.  


I hope you enjoy this meal…it’s like Thanksgiving any time of the year!!!  Happy eating!!!


Thursday, September 12, 2013

Creamy Chicken and Wild Rice Soup

I've been sick the last few days and wanted chicken soup...as per my usual, I altered a recipe I found to suit my needs.  It tasted really good and was a great comfort soup for when I was feeling really sick!  Hope you like it as much as I did!
 

Ingredients:

2 Chicken Breasts or 4 Chicken Thighs 
4 cups Water 
4 cups Chicken Broth 
4 Carrots - cut (I bought the pre-crinkle cut ones)
4 stalks Celery - cut 
1 can Diced Tomatoes 
1 package quick cooking Long Grain and Wild Rice with seasoning packet 
Salt & Pepper 
3/4 cup Flour 
1/2 cup Butter 
2 cups Heavy Cream 

Directions:

Boil chicken in 4 cups of water - add salt, pepper, garlic, onion, garlic powder and chicken bouillon until almost cooked. After it boils for a bit, I lower the heat to control the cooking. 

Pull chicken out and put in carrots and celery. Add the chicken broth. 

Cut chicken into bite size pieces or do what I do and take two forks and pull it apart - put back in soup. Bring to a boil, stir in rice (leaving seasoning packet out), cover and turn off heat. 

In a small bowl, mix flour, salt and pepper. In a medium saucepan, melt butter over medium heat and stir in seasoning packet until mixed and bubbly, reduce heat to low and start mixing in the flour mixture little by little to form a roux. Slowly whisk in heavy cream little by little until mixed and smooth. Cook until thickened - about 5 minutes. 

Add cream mixture into soup pot and bring to a boil and reduce to medium heat and cook for about 15 minutes - stirring occasionally to prevent rice from sticking to the bottom.

Sunday, September 8, 2013

Tabby's Sangria

Week 1 of Football Season 2013, I wanted to have something new and creative to drink for game day.  My boyfriend and I had just gone out to a jazz lounge before the game and I had Sangria for the first time.  I knew this had to be my new drink!  It seemed like fun to make and I love sweet red wine...win win, or wine wine...hahaha!  Yes, I am a confirmed dork and I laugh at my own jokes!


Anyway, researched a few recipes, and did what I usually do - take bits and pieces that I like from each one and made my own...and here is Tabby's Sangria!

Ingredients:


1 pkg raspberries
1 pkg blackberries
1/2 lb strawberries - halved
1 apple sliced
1 tangerine sliced
1 lemon sliced
1 lime sliced
2 bottles Sutter Home Sweet Red
1 cup brandy
Sugar, to taste
Wild Vines Strawberry White Zinfandel or Heineken Light


Mix all fruits, sweet red, brandy and sugar. Chill for at least a couple of hours. Pour over ice, filling glass 3/4th...top off with Wild Vines or Heineken Light, stir and enjoy!


Side note:  my original recipe was for the Wild Vines, but my boyfriend and I realized it was waaaaaaaaaaaay better with Heineken Light.  Trust me, I hate beer, refused to drink it for a very long time and I can actually drink it with this or my Raspberry or Strawberry Lemonade recipe.


And here is Thanksgiving 2013 Sangria at my boyfriend's family's house.  Used Sutter Home Red Moscato and Arbor Mist because those were what they had at the store.